> ## Documentation Index
> Fetch the complete documentation index at: https://academy.pathfindr.ai/llms.txt
> Use this file to discover all available pages before exploring further.
# Start Building With ChatGPT
> A practical guide to building your first Custom GPT using the GPT Builder inside ChatGPT.
export const Quiz = ({question, options, correctIndex, explanation}) => {
const [selected, setSelected] = useState(null);
const [showResult, setShowResult] = useState(false);
const handleSelect = index => {
if (showResult) return;
setSelected(index);
setShowResult(true);
};
const isCorrect = selected === correctIndex;
return
;
};
## What you'll learn
Custom GPTs are your own purpose-built versions of ChatGPT. You give them a name, a set of instructions, and optionally a knowledge source or external connection — and they deliver consistent, on-point results every time, without you re-explaining the context.
What they are and when to build one
Define scope, instructions, and knowledge
Set up the Configure tab and add data sources
Publish to your team or workspace
***
## What is a Custom GPT?
A Custom GPT is a version of ChatGPT you configure yourself. It has your instructions baked in, your knowledge sources connected, and your preferred conversational style set — so every conversation starts exactly where it needs to.
The GPT Builder is available to all ChatGPT Plus, Team, and Enterprise users. You do not need to write code.
| Regular ChatGPT | Custom GPT |
| --------------------------------- | ---------------------------- |
| You re-explain context every time | Instructions are persistent |
| General-purpose | Built for a specific task |
| Personal use | Shareable across your team |
| No memory between sessions | Can reference your documents |
**Enterprise stat:** According to OpenAI's March 2025 enterprise report, users who work with Custom GPTs save an average of **40–60 minutes per day** on repetitive tasks. 20% of all enterprise messages are now processed via a Custom GPT or Project.
***
## Where to find the GPT Builder
In ChatGPT, click your **profile icon** in the top right, then select **My GPTs**. From here you can see GPTs you have created or have access to, and click **Create a GPT** to open the builder.
The builder has two tabs: **Create** (a conversational setup flow) and **Configure** (manual fields). Always use **Configure** — it gives you full control over every setting and is faster once you know what you are doing.
***
## Planning your Custom GPT
Before you open the builder, define these three things. GPTs without clear planning are hard to test and easy to misuse.
Write exactly what this GPT does. Example: "This GPT helps account managers write personalised follow-up emails after client meetings, using the notes the user provides."
If it takes more than one sentence, narrow the scope.
List the documents, policies, or templates your GPT should reference. These become your knowledge sources. Supported formats: PDF, Word (.docx), plain text. In 2026, you can also connect Google Drive or Slack natively.
If it is just for you, keep it private. If your team will use it, decide on sharing before you build — ChatGPT Team workspaces let you publish GPTs internally so the whole organisation can find and use them.
***
## Building your Custom GPT
The **Instructions** field is the most important configuration you will make. This is the persistent system prompt — it tells the GPT what to do, how to respond, what to avoid, and what format to use.
*Example instruction structure:*
```text theme={null}
You are a follow-up email writer for the account management
team at [Company]. When the user shares meeting notes, write
a personalised follow-up email that:
- Opens with a specific reference to something discussed
- Summarises the key agreed actions (numbered list)
- Closes with a clear next step and proposed date
Keep it under 180 words. Professional but warm.
```
Click **Upload files** to add reference documents. Your GPT will search these automatically when relevant.
**Supported formats:** PDF, Word (.docx), plain text, CSV
**New connectors (2026):**
ChatGPT now supports native connections to **Google Drive**, **Slack**, and **Power BI** as knowledge sources — not just uploaded files. Enterprise admins can enable these in workspace settings under **Connections**.
***
## Capabilities and model selection
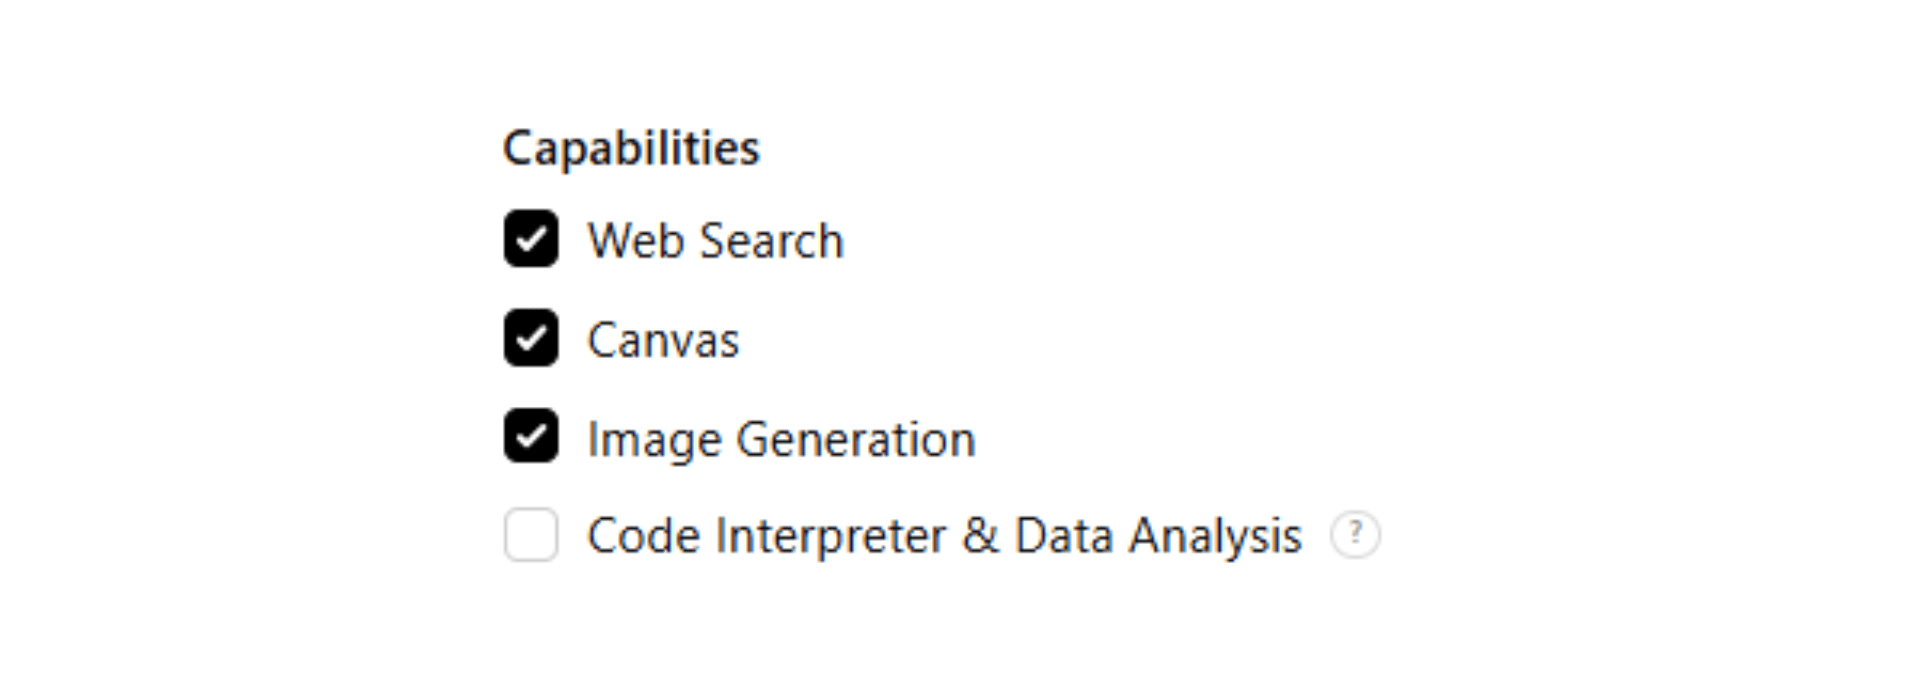
In the Configure tab, scroll to **Capabilities**. Toggle on what your GPT needs:
* **Web search** — for GPTs that need current information
* **Image generation** — for creative or visual tasks
* **Code interpreter** — for data analysis, file processing, or calculations
Only enable what the GPT actually needs. Extra capabilities can confuse it.
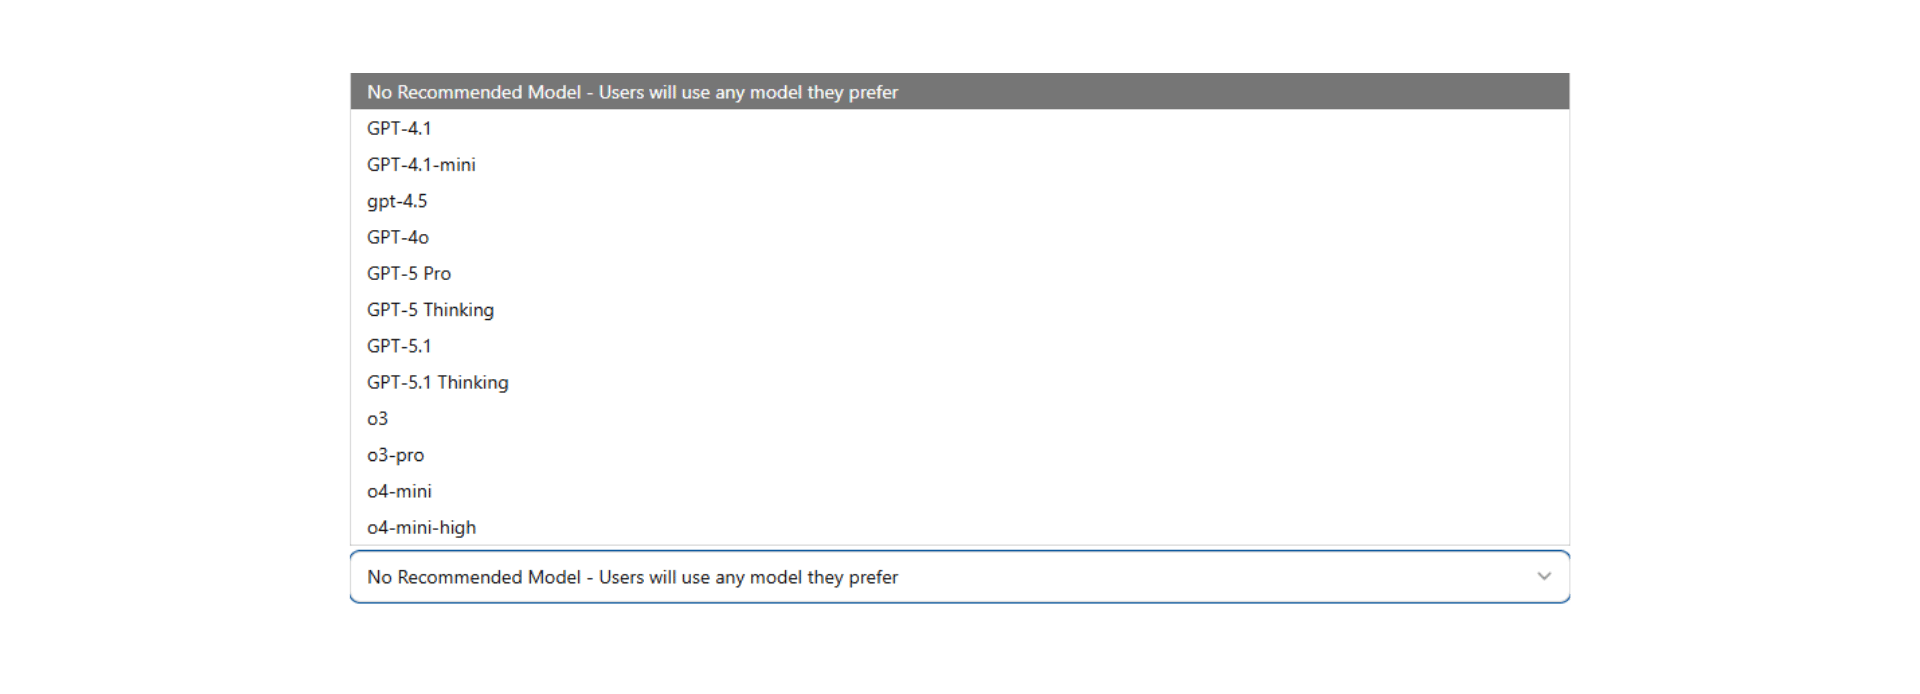
**New in 2026 (Enterprise):** ChatGPT Team and Enterprise admins can now **pin a specific model version** to a GPT — ensuring all users get consistent responses regardless of which model ChatGPT defaults to.
For most workplace GPTs, the default model works well. Use model pinning when consistency across time is critical (e.g., a compliance GPT where answer drift is a risk).
***
## Memory and context
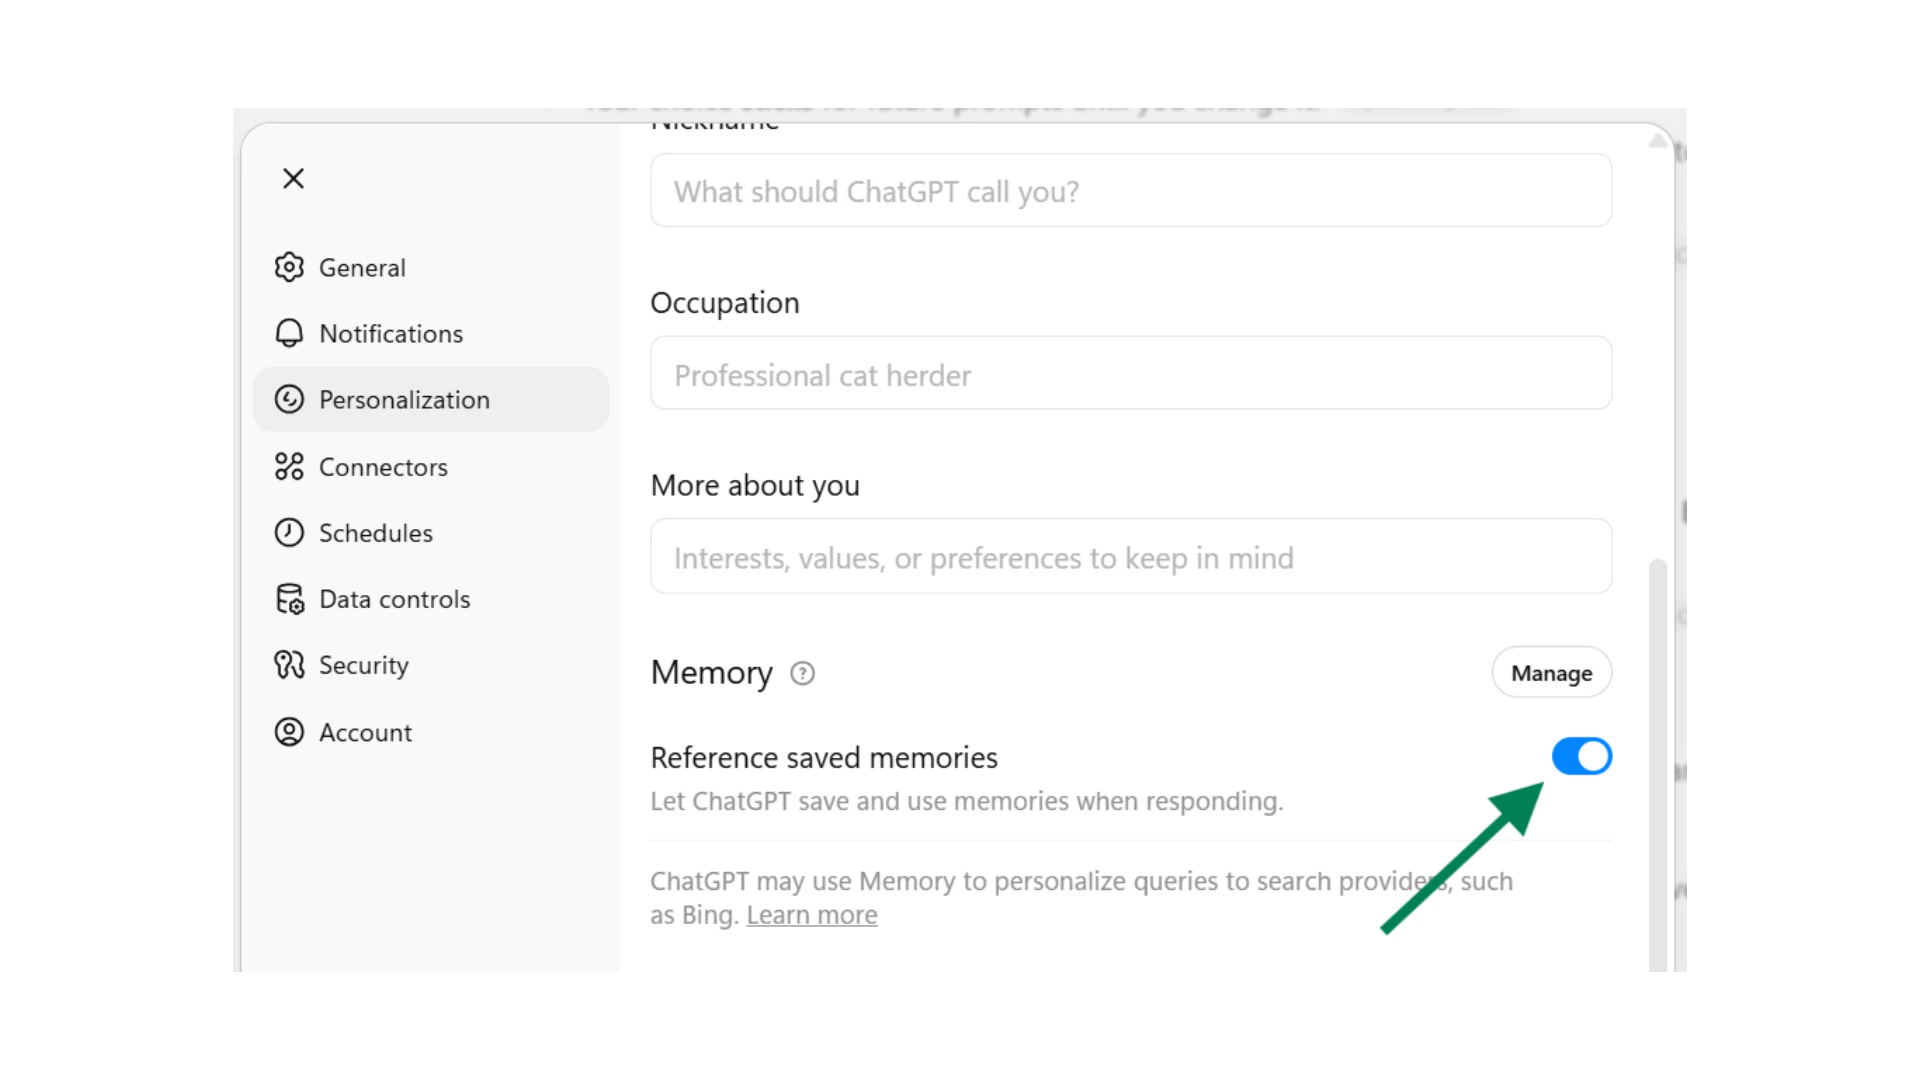
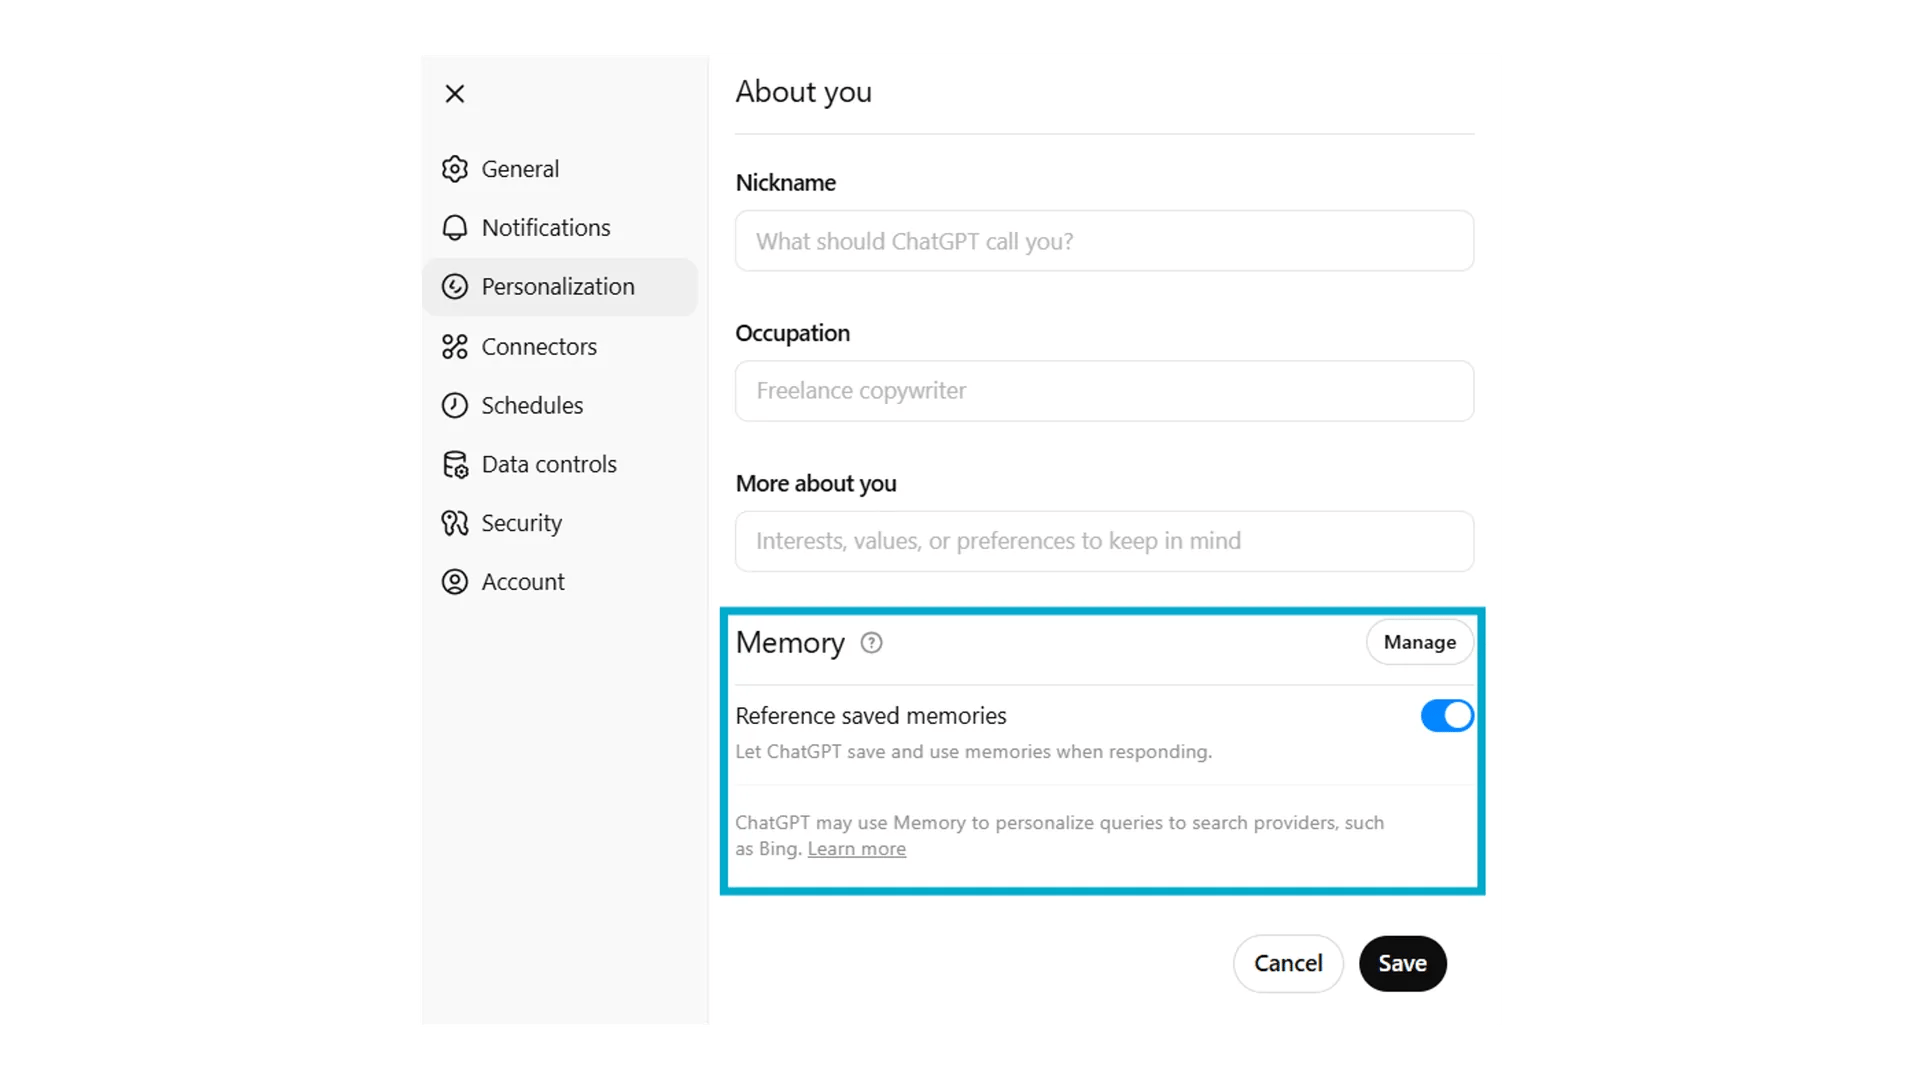
**New in 2026:** ChatGPT's enhanced Memory now works across sessions. When a user enables Memory, ChatGPT remembers key context from past conversations — including preferences, past decisions, and recurring tasks. This makes Custom GPTs even stickier for power users who return to the same GPT regularly.
Memory is controlled per-user in **Settings → Personalisation → Memory**.
Users can see what ChatGPT has remembered and delete specific memories at any time. As a GPT builder, include a note in your instructions about what the GPT should prioritise remembering — for example: "If the user shares their job title, team size, or preferred format, remember this for future conversations."
For enterprise users: data used in Custom GPTs and Projects is **not used to train the base ChatGPT model**. This is confirmed in the OpenAI Enterprise privacy policy. It is safe to reference for organisations with data sensitivity concerns.
***
## Sharing your Custom GPT
If you are on a ChatGPT **Team or Enterprise plan**, you can publish a GPT to your workspace so all members can find and use it. In the builder, click **Save**, then set visibility to **Anyone in \[workspace name]**.
Your GPT will appear in the team's GPT library. Members do not need to create their own version — they just open it and use it.
You can also generate a direct link to your GPT. Click the three-dot menu on your GPT and select **Copy link**. Anyone with the link and a ChatGPT account can access it (subject to the visibility setting you chose).
This is useful for sharing with external collaborators or embedding a GPT link in a handbook or intranet page.
Advanced GPTs can connect to external tools via **Actions** — essentially API calls that let the GPT pull data from or push data to other systems. Common use cases: triggering a Zapier workflow, pulling CRM data, or submitting a form.
Actions require some technical setup. For most workplace GPTs, knowledge files and instructions are sufficient.
***
## Quick checkpoint
You are done with this module when you can do the following:
You can describe your GPT in one clear sentence
You have written instructions that define task, format, and scope
You have uploaded at least one file or connected a data source
You have written at least one useful conversation starter
Complete the challenge to build and test your first Custom GPT
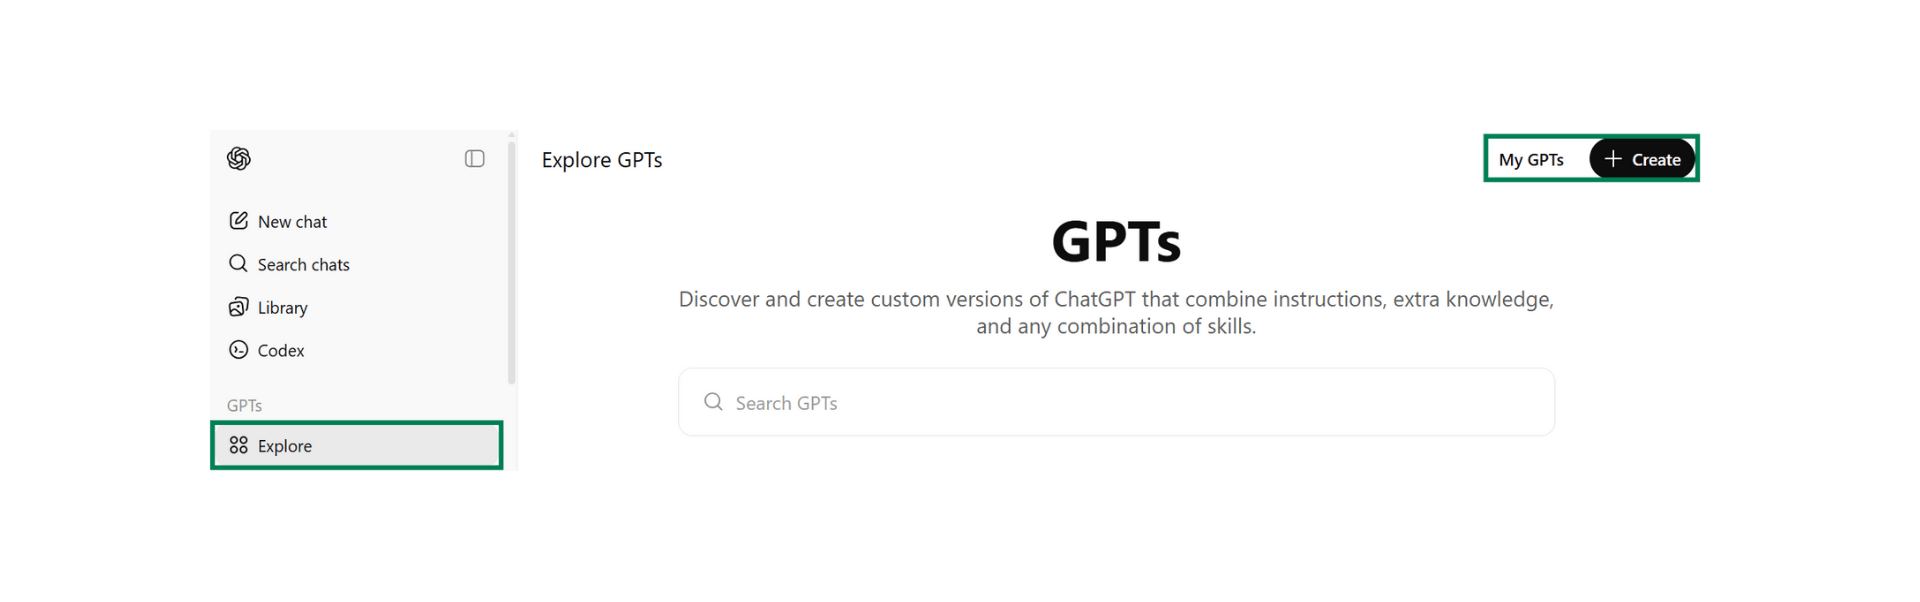 In ChatGPT, click your **profile icon** in the top right, then select **My GPTs**. From here you can see GPTs you have created or have access to, and click **Create a GPT** to open the builder.
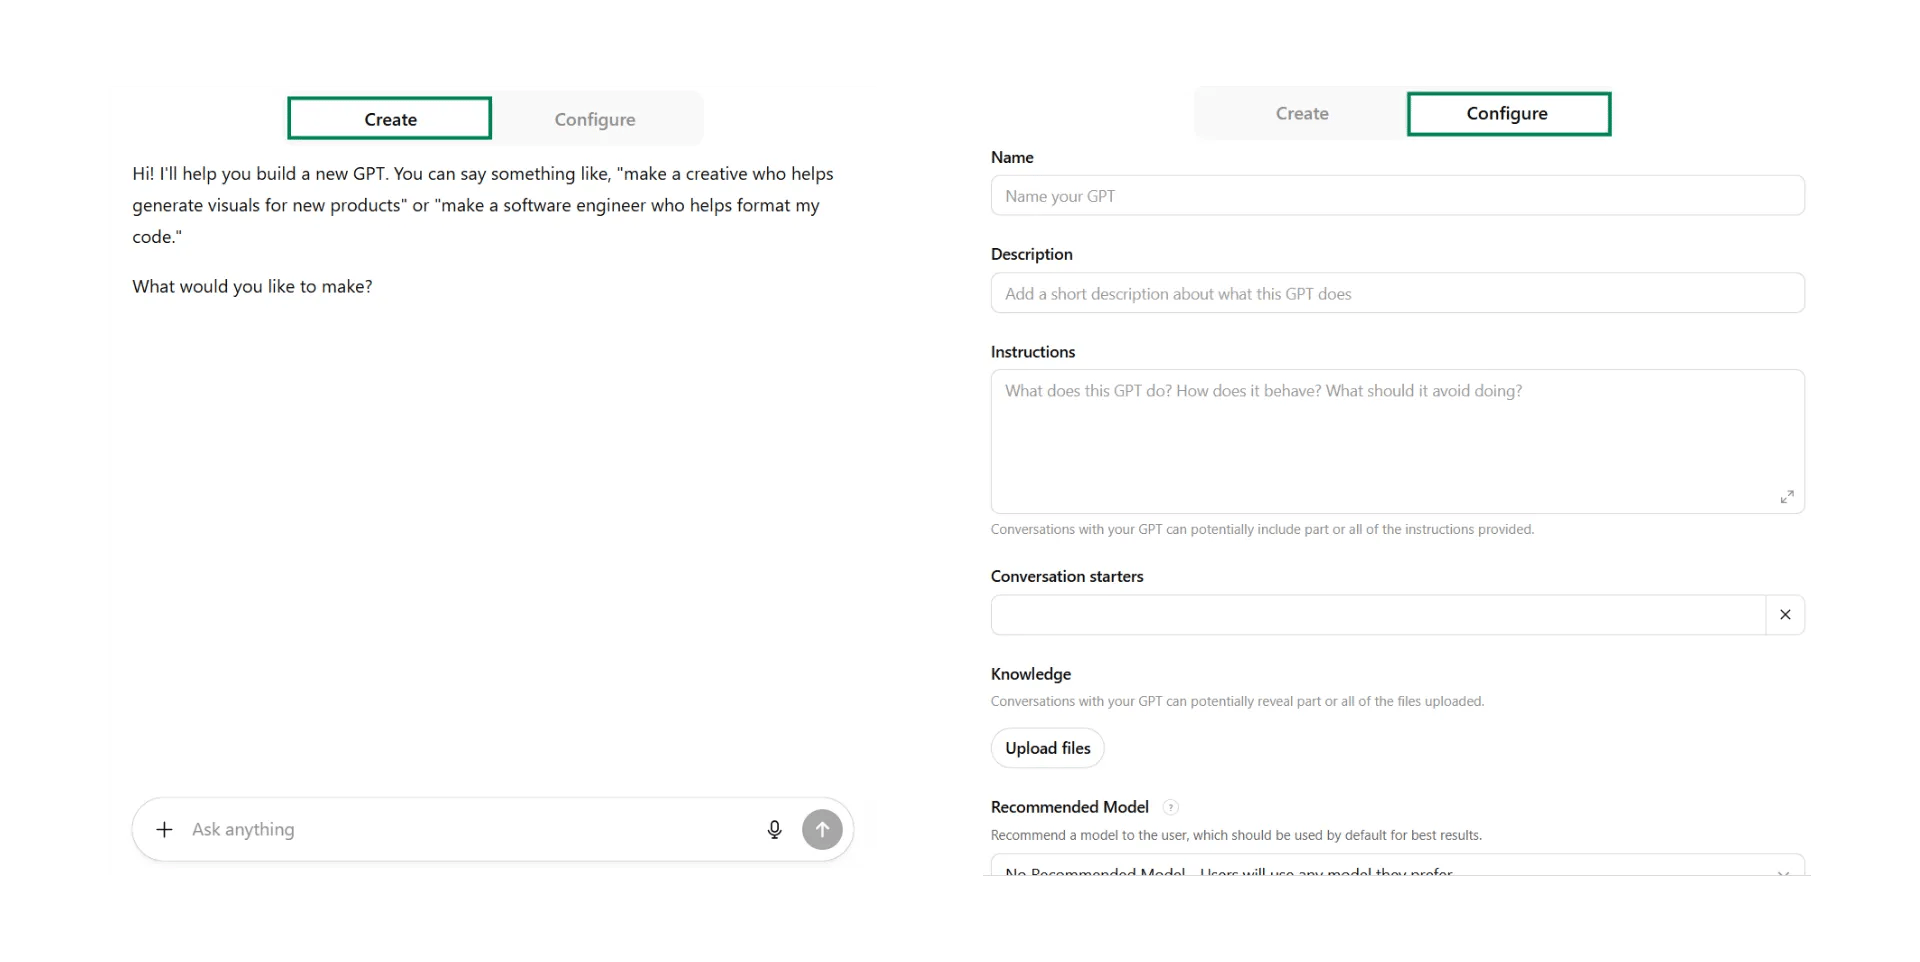 The builder has two tabs: **Create** (a conversational setup flow) and **Configure** (manual fields). Always use **Configure** — it gives you full control over every setting and is faster once you know what you are doing.
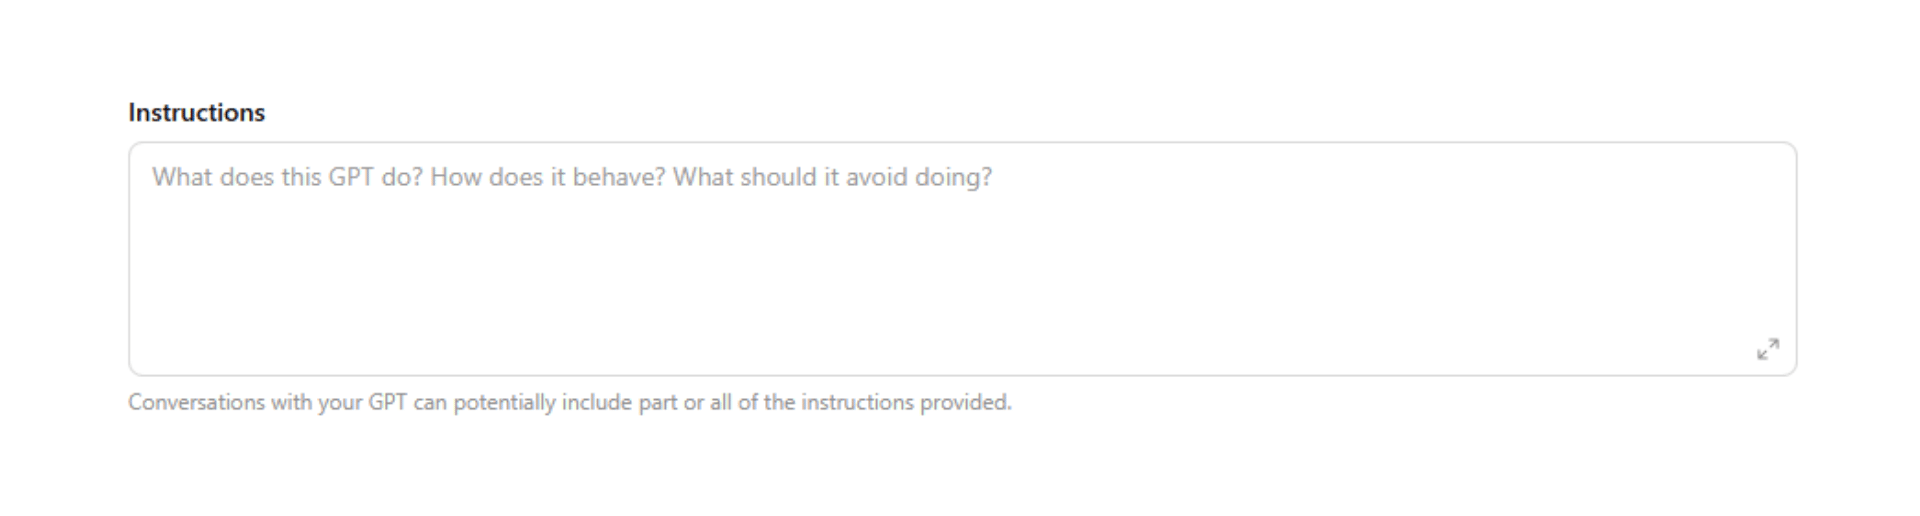 The **Instructions** field is the most important configuration you will make. This is the persistent system prompt — it tells the GPT what to do, how to respond, what to avoid, and what format to use.
*Example instruction structure:*
```text theme={null}
You are a follow-up email writer for the account management
team at [Company]. When the user shares meeting notes, write
a personalised follow-up email that:
- Opens with a specific reference to something discussed
- Summarises the key agreed actions (numbered list)
- Closes with a clear next step and proposed date
Keep it under 180 words. Professional but warm.
```
The **Instructions** field is the most important configuration you will make. This is the persistent system prompt — it tells the GPT what to do, how to respond, what to avoid, and what format to use.
*Example instruction structure:*
```text theme={null}
You are a follow-up email writer for the account management
team at [Company]. When the user shares meeting notes, write
a personalised follow-up email that:
- Opens with a specific reference to something discussed
- Summarises the key agreed actions (numbered list)
- Closes with a clear next step and proposed date
Keep it under 180 words. Professional but warm.
```
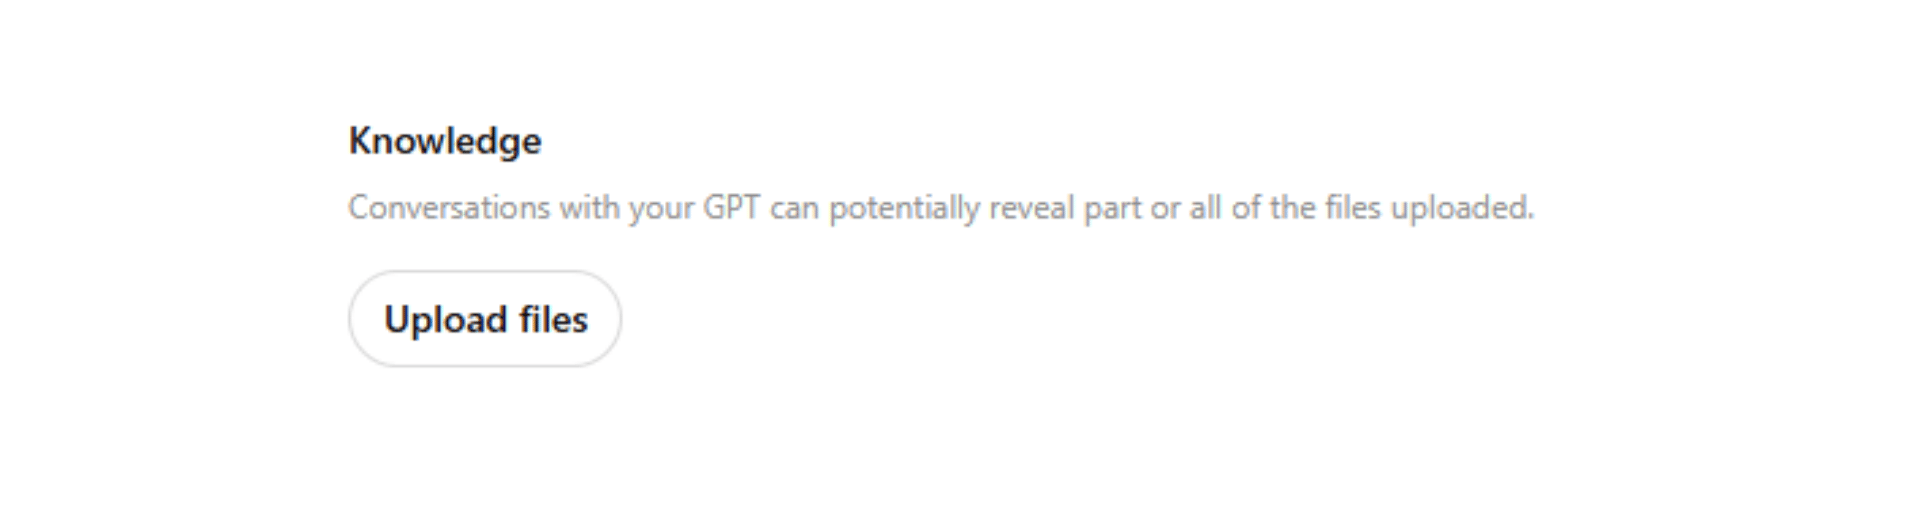 Click **Upload files** to add reference documents. Your GPT will search these automatically when relevant.
**Supported formats:** PDF, Word (.docx), plain text, CSV
**New connectors (2026):**
Click **Upload files** to add reference documents. Your GPT will search these automatically when relevant.
**Supported formats:** PDF, Word (.docx), plain text, CSV
**New connectors (2026):**
 In the Configure tab, scroll to **Capabilities**. Toggle on what your GPT needs:
* **Web search** — for GPTs that need current information
* **Image generation** — for creative or visual tasks
* **Code interpreter** — for data analysis, file processing, or calculations
Only enable what the GPT actually needs. Extra capabilities can confuse it.
In the Configure tab, scroll to **Capabilities**. Toggle on what your GPT needs:
* **Web search** — for GPTs that need current information
* **Image generation** — for creative or visual tasks
* **Code interpreter** — for data analysis, file processing, or calculations
Only enable what the GPT actually needs. Extra capabilities can confuse it.
 **New in 2026 (Enterprise):** ChatGPT Team and Enterprise admins can now **pin a specific model version** to a GPT — ensuring all users get consistent responses regardless of which model ChatGPT defaults to.
For most workplace GPTs, the default model works well. Use model pinning when consistency across time is critical (e.g., a compliance GPT where answer drift is a risk).
**New in 2026 (Enterprise):** ChatGPT Team and Enterprise admins can now **pin a specific model version** to a GPT — ensuring all users get consistent responses regardless of which model ChatGPT defaults to.
For most workplace GPTs, the default model works well. Use model pinning when consistency across time is critical (e.g., a compliance GPT where answer drift is a risk).
 **New in 2026:** ChatGPT's enhanced Memory now works across sessions. When a user enables Memory, ChatGPT remembers key context from past conversations — including preferences, past decisions, and recurring tasks. This makes Custom GPTs even stickier for power users who return to the same GPT regularly.
Memory is controlled per-user in **Settings → Personalisation → Memory**.
**New in 2026:** ChatGPT's enhanced Memory now works across sessions. When a user enables Memory, ChatGPT remembers key context from past conversations — including preferences, past decisions, and recurring tasks. This makes Custom GPTs even stickier for power users who return to the same GPT regularly.
Memory is controlled per-user in **Settings → Personalisation → Memory**.
 Users can see what ChatGPT has remembered and delete specific memories at any time. As a GPT builder, include a note in your instructions about what the GPT should prioritise remembering — for example: "If the user shares their job title, team size, or preferred format, remember this for future conversations."
 Advanced GPTs can connect to external tools via **Actions** — essentially API calls that let the GPT pull data from or push data to other systems. Common use cases: triggering a Zapier workflow, pulling CRM data, or submitting a form.
Actions require some technical setup. For most workplace GPTs, knowledge files and instructions are sufficient.
Advanced GPTs can connect to external tools via **Actions** — essentially API calls that let the GPT pull data from or push data to other systems. Common use cases: triggering a Zapier workflow, pulling CRM data, or submitting a form.
Actions require some technical setup. For most workplace GPTs, knowledge files and instructions are sufficient.