> ## Documentation Index
> Fetch the complete documentation index at: https://academy.pathfindr.ai/llms.txt
> Use this file to discover all available pages before exploring further.
# Reading Material
> Learn how to use Copilot's visual features to create images, analyse photos, and build presentations faster
## Use visuals to get more from Copilot
Most people use Copilot by typing. But Copilot can also create images
for you and understand images
you share with it. That means you can ask it to design a visual for a slide deck, or upload a photo of a whiteboard and have it pull out the key points.
These visual features sit inside the tools you already use: PowerPoint, the Copilot chat in your browser, and Microsoft Teams. No extra software, no design skills required.
This page will show you how to:
Generate visuals for presentations, emails, and documents using a text description
Share a photo, screenshot, or diagram and let Copilot read and summarise it
Add AI-created images directly into PowerPoint presentations
Know when to use Work mode vs Web mode for visual tasks
***
## Meet Designer in Copilot
When you ask Copilot to create an image in the normal chat, it generates a single result based on your prompt. That works for quick one-off visuals. But if you need more control, such as choosing aspect ratios, refining specific areas of an image, or editing an existing photo, you want Designer
.
Designer is a dedicated image creation and editing workspace that is now built directly into Microsoft 365 Copilot. You can access it from the Create
tab in the Copilot app, or by opening Designer at designer.microsoft.com. It uses the same AI models as Copilot chat (currently GPT-Image-1.5, rolled out January 2026), but gives you a visual editor alongside the prompt box so you can see and adjust your work side by side.
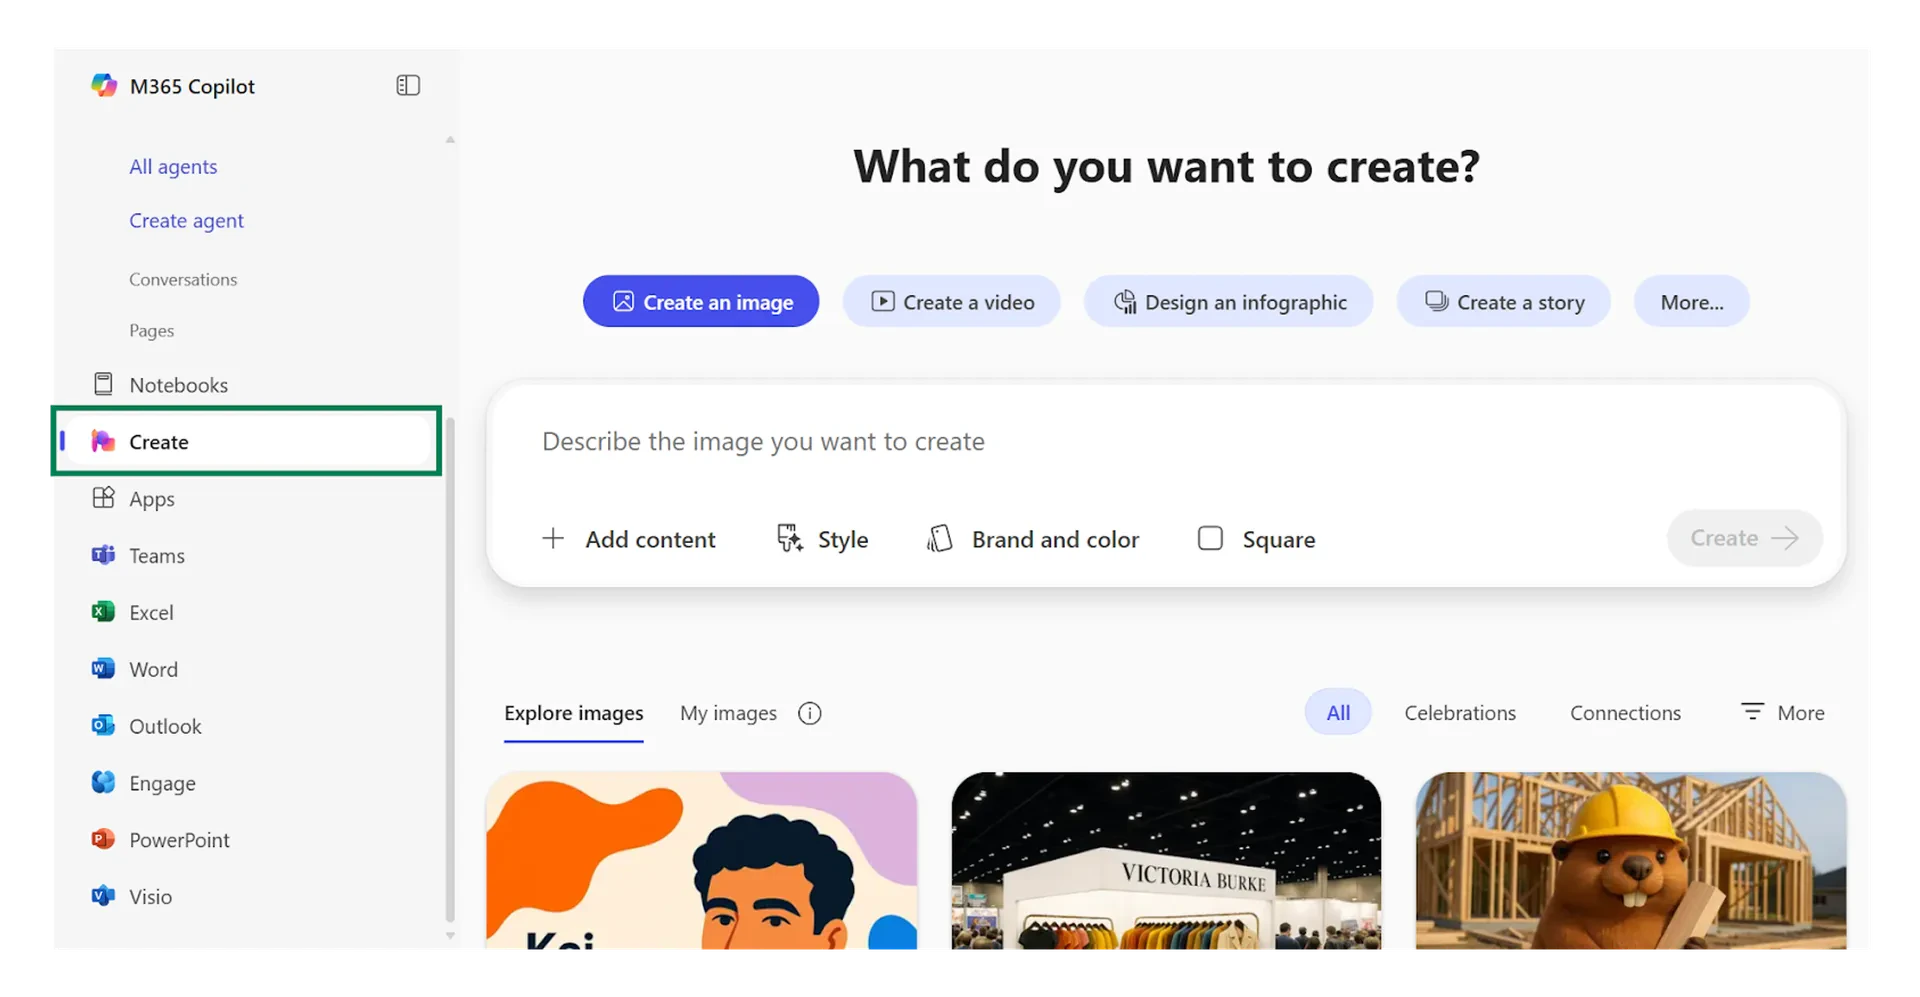 Type a prompt, get a single image back. Good for quick concepts and throwaway visuals. Limited editing options after the image is generated.
Full visual editor with prompt refinement, aspect ratio controls, regional editing, and the ability to upload your own images for modification. Better for anything you plan to share or publish.
Here is what Designer handles that normal chat does not:
Select a region of your image and change just that section. Swap a background, remove an object, or replace text without regenerating the whole image.
Upload a photo or graphic you already have. Ask Designer to enhance it, change the style, add elements, or adapt it for a different format.
Choose the right dimensions before you generate. Create images sized for PowerPoint slides, social media posts, email headers, or Teams backgrounds in one step.
The standalone Designer bot in Microsoft Teams was retired on 27 February 2026. All of its features are now part of Microsoft 365 Copilot. If you used the Teams bot before, you will find the same capabilities (and more) in the Copilot app.
export const quizDesigner = {
question: "What is the main advantage of using Designer over asking Copilot chat to create an image?",
options: ["Designer uses a different AI model", "Designer gives you a visual editor with controls for aspect ratio, regional editing, and the ability to upload your own images", "Designer is faster at generating images", "Designer is only available on mobile devices"],
correctIndex: 1,
explanation: "While both use the same GPT-Image-1.5 model, Designer provides a side-by-side visual editor that lets you refine specific areas, resize for different channels, and start from your own images. Normal chat only returns a single image with limited editing."
};
***
## Create images from a description
Open Copilot in your browser (copilot.microsoft.com) or in Microsoft Teams and type what you want to see. Copilot uses Designer (built in) to generate an image based on your description. You do not need a separate Designer account.
This works for social media graphics, presentation visuals, concept illustrations, and simple diagrams. The image appears in your chat and you can download it, copy it, or refine it with follow-up instructions.
Type a prompt, get a single image back. Good for quick concepts and throwaway visuals. Limited editing options after the image is generated.
Full visual editor with prompt refinement, aspect ratio controls, regional editing, and the ability to upload your own images for modification. Better for anything you plan to share or publish.
Here is what Designer handles that normal chat does not:
Select a region of your image and change just that section. Swap a background, remove an object, or replace text without regenerating the whole image.
Upload a photo or graphic you already have. Ask Designer to enhance it, change the style, add elements, or adapt it for a different format.
Choose the right dimensions before you generate. Create images sized for PowerPoint slides, social media posts, email headers, or Teams backgrounds in one step.
The standalone Designer bot in Microsoft Teams was retired on 27 February 2026. All of its features are now part of Microsoft 365 Copilot. If you used the Teams bot before, you will find the same capabilities (and more) in the Copilot app.
export const quizDesigner = {
question: "What is the main advantage of using Designer over asking Copilot chat to create an image?",
options: ["Designer uses a different AI model", "Designer gives you a visual editor with controls for aspect ratio, regional editing, and the ability to upload your own images", "Designer is faster at generating images", "Designer is only available on mobile devices"],
correctIndex: 1,
explanation: "While both use the same GPT-Image-1.5 model, Designer provides a side-by-side visual editor that lets you refine specific areas, resize for different channels, and start from your own images. Normal chat only returns a single image with limited editing."
};
***
## Create images from a description
Open Copilot in your browser (copilot.microsoft.com) or in Microsoft Teams and type what you want to see. Copilot uses Designer (built in) to generate an image based on your description. You do not need a separate Designer account.
This works for social media graphics, presentation visuals, concept illustrations, and simple diagrams. The image appears in your chat and you can download it, copy it, or refine it with follow-up instructions.
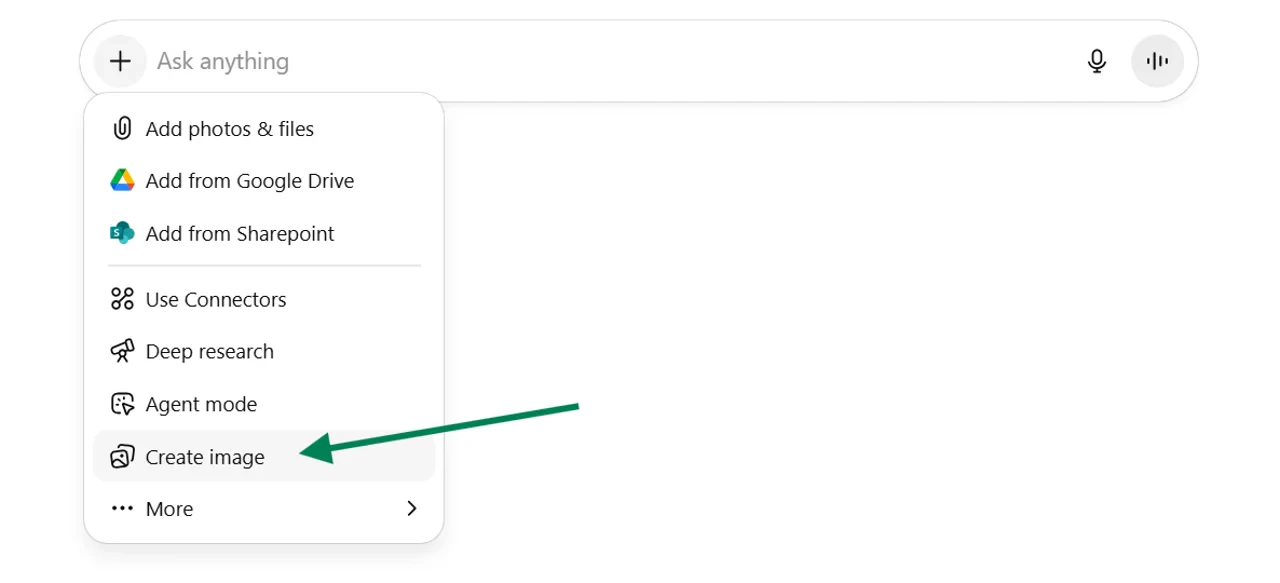 "Create a clean, professional illustration of a team collaborating around a table with laptops, in a modern office setting. Use blue and white tones."
"Make me a picture of teamwork."
Be specific about the style, colours, and setting you want. The more detail you give, the closer the result will be to what you need. You can also ask Copilot to revise specific parts of the image after it generates.
***
## Upload a photo and ask Copilot about it
You can share an image with Copilot and ask questions about it. Click the image icon in the chat bar, upload a photo from your device, and type your question.
This is useful in more situations than you might expect. Here are a few ways people across different teams are using it.
Snap a photo of your whiteboard after a brainstorm. Ask Copilot to list the key themes and turn them into action items.
Photograph a printed form, receipt, or contract page. Ask Copilot to extract specific details or summarise the content.
Screenshot a chart from a report or dashboard. Ask Copilot to explain what the data shows and suggest talking points.
Copilot accepts JPEG, PNG, GIF, and WEBP images. Maximum file size is 20 MB. You can upload one image at a time in the chat window.
Images you upload in a chat session are processed to generate a response but are not permanently stored by Microsoft. Check your organisation's data governance policy for specifics on how your tenant handles uploaded content.
Use Work mode
when uploading anything work-related. Work mode keeps your data within your organisation's Microsoft 365 boundary. Avoid uploading confidential material in Web mode.
export const quizUpload = {
question: "You need to upload a screenshot of an internal sales dashboard and ask Copilot to summarise the trends. Which mode should you use?",
options: ["Web mode, because it has better image analysis", "Work mode, because your data stays within your organisation's Microsoft 365 boundary", "Either mode works the same for image uploads", "You cannot upload images to Copilot"],
correctIndex: 1,
explanation: "When uploading anything work-related, always use Work mode. This ensures your data stays within your organisation's Microsoft 365 environment and is not processed outside your data boundary."
};
***
## Add AI images to your presentations
Copilot in PowerPoint can generate images for your slides without leaving the app. Open a presentation, select the Copilot panel, and ask it to create a visual that fits your content.
"Create a clean, professional illustration of a team collaborating around a table with laptops, in a modern office setting. Use blue and white tones."
"Make me a picture of teamwork."
Be specific about the style, colours, and setting you want. The more detail you give, the closer the result will be to what you need. You can also ask Copilot to revise specific parts of the image after it generates.
***
## Upload a photo and ask Copilot about it
You can share an image with Copilot and ask questions about it. Click the image icon in the chat bar, upload a photo from your device, and type your question.
This is useful in more situations than you might expect. Here are a few ways people across different teams are using it.
Snap a photo of your whiteboard after a brainstorm. Ask Copilot to list the key themes and turn them into action items.
Photograph a printed form, receipt, or contract page. Ask Copilot to extract specific details or summarise the content.
Screenshot a chart from a report or dashboard. Ask Copilot to explain what the data shows and suggest talking points.
Copilot accepts JPEG, PNG, GIF, and WEBP images. Maximum file size is 20 MB. You can upload one image at a time in the chat window.
Images you upload in a chat session are processed to generate a response but are not permanently stored by Microsoft. Check your organisation's data governance policy for specifics on how your tenant handles uploaded content.
Use Work mode
when uploading anything work-related. Work mode keeps your data within your organisation's Microsoft 365 boundary. Avoid uploading confidential material in Web mode.
export const quizUpload = {
question: "You need to upload a screenshot of an internal sales dashboard and ask Copilot to summarise the trends. Which mode should you use?",
options: ["Web mode, because it has better image analysis", "Work mode, because your data stays within your organisation's Microsoft 365 boundary", "Either mode works the same for image uploads", "You cannot upload images to Copilot"],
correctIndex: 1,
explanation: "When uploading anything work-related, always use Work mode. This ensures your data stays within your organisation's Microsoft 365 environment and is not processed outside your data boundary."
};
***
## Add AI images to your presentations
Copilot in PowerPoint can generate images for your slides without leaving the app. Open a presentation, select the Copilot panel, and ask it to create a visual that fits your content.
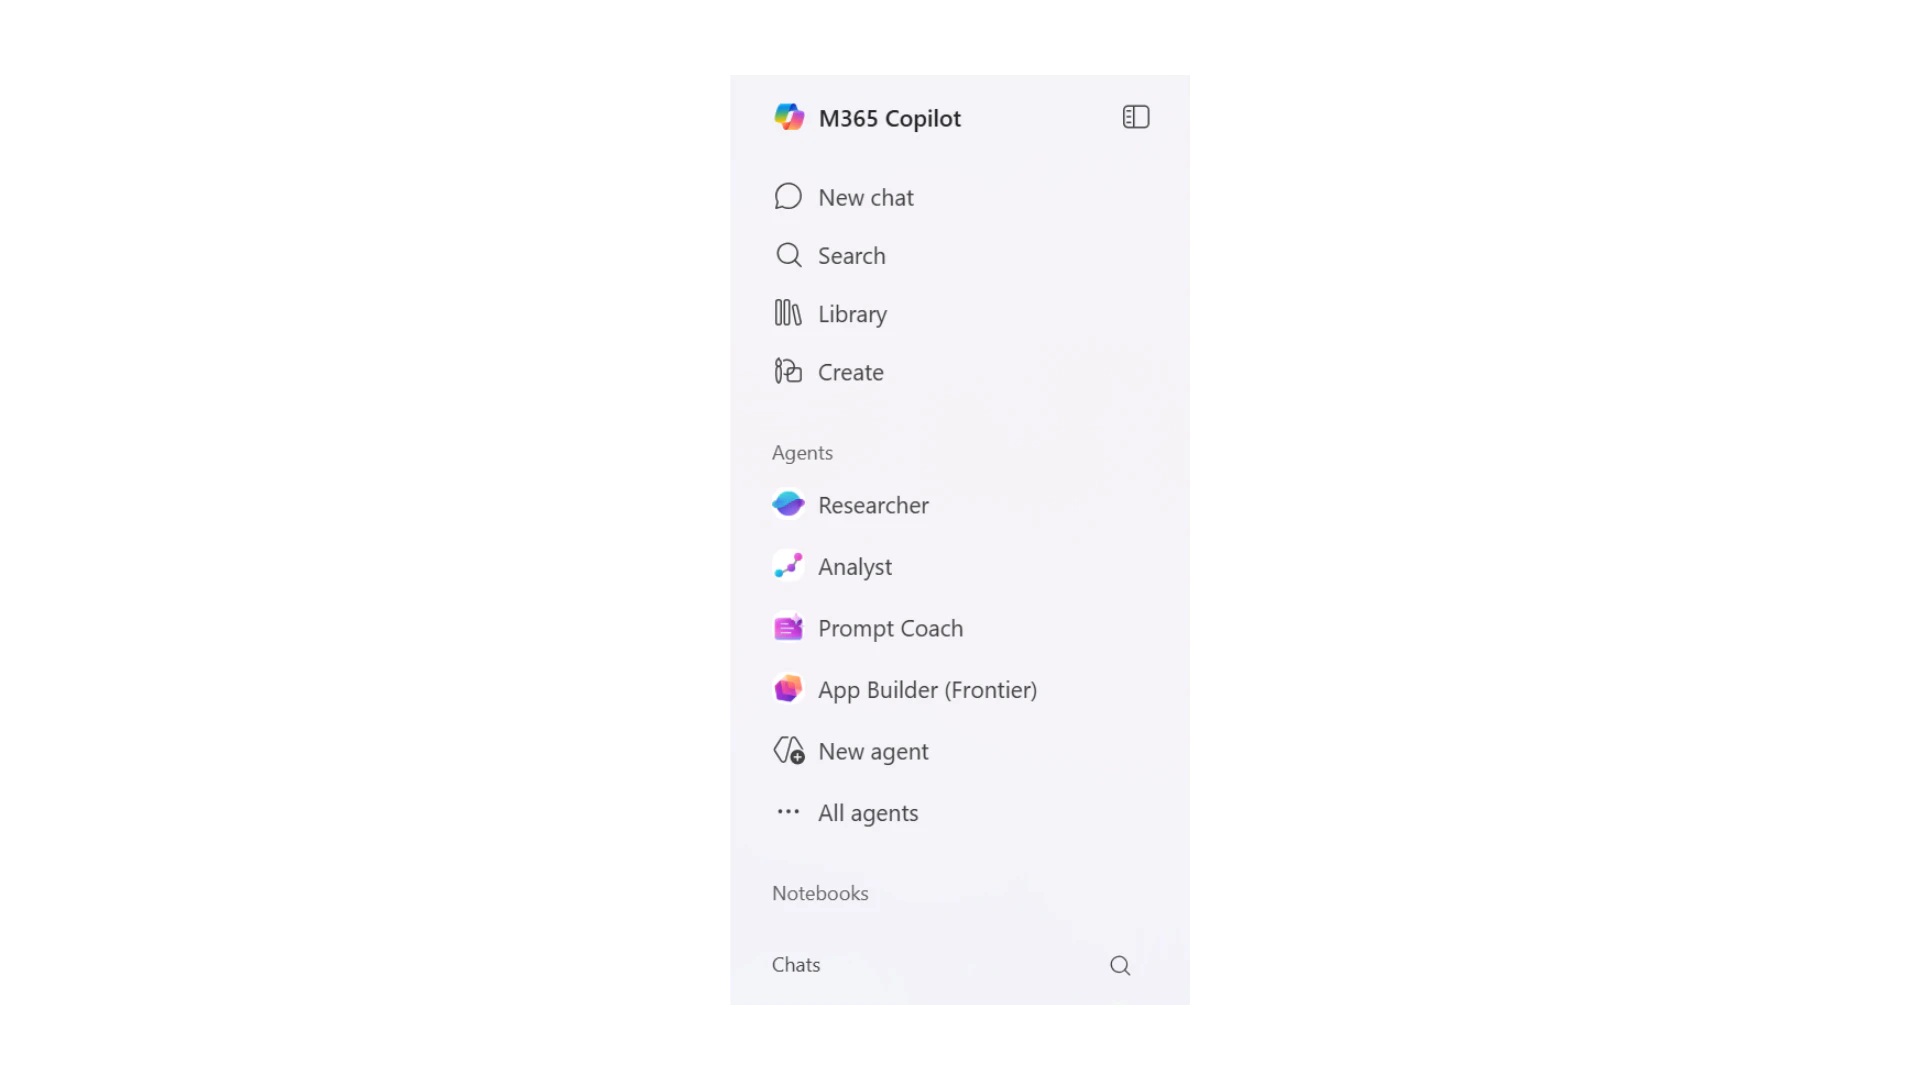 Open an existing PowerPoint file or start a new one. Click the Copilot icon in the ribbon to open the side panel.
Type something like: "Create an image of a customer journey map with four stages, using a modern flat design style." Be specific about the content, style, and colour palette.
Copilot generates the image in the panel. Click to insert it into your slide. Resize and reposition it as needed. If it is not quite right, ask Copilot to adjust specific elements.
Copilot uses GPT-Image-1.5 for image generation (rolled out January 2026). This produces sharper results, better lighting, and generates images up to four times faster than the previous model.
export const quizPowerPoint = {
question: "What is the correct first step to generate an AI image inside PowerPoint?",
options: ["Open Designer from the Start menu", "Go to copilot.microsoft.com and paste the image into your slide", "Click the Copilot icon in the PowerPoint ribbon to open the side panel, then describe the image you need", "Right-click on a slide and select 'Generate Image'"],
correctIndex: 2,
explanation: "You access image generation in PowerPoint through the Copilot side panel. Click the Copilot icon in the ribbon, describe what you need, and Copilot generates the image directly in the panel for you to insert."
};
***
## Work mode vs Web mode for visuals
The Work/Web toggle
matters when you are working with images. Choosing the right mode affects both the quality of the result and where your data goes.
Open an existing PowerPoint file or start a new one. Click the Copilot icon in the ribbon to open the side panel.
Type something like: "Create an image of a customer journey map with four stages, using a modern flat design style." Be specific about the content, style, and colour palette.
Copilot generates the image in the panel. Click to insert it into your slide. Resize and reposition it as needed. If it is not quite right, ask Copilot to adjust specific elements.
Copilot uses GPT-Image-1.5 for image generation (rolled out January 2026). This produces sharper results, better lighting, and generates images up to four times faster than the previous model.
export const quizPowerPoint = {
question: "What is the correct first step to generate an AI image inside PowerPoint?",
options: ["Open Designer from the Start menu", "Go to copilot.microsoft.com and paste the image into your slide", "Click the Copilot icon in the PowerPoint ribbon to open the side panel, then describe the image you need", "Right-click on a slide and select 'Generate Image'"],
correctIndex: 2,
explanation: "You access image generation in PowerPoint through the Copilot side panel. Click the Copilot icon in the ribbon, describe what you need, and Copilot generates the image directly in the panel for you to insert."
};
***
## Work mode vs Web mode for visuals
The Work/Web toggle
matters when you are working with images. Choosing the right mode affects both the quality of the result and where your data goes.
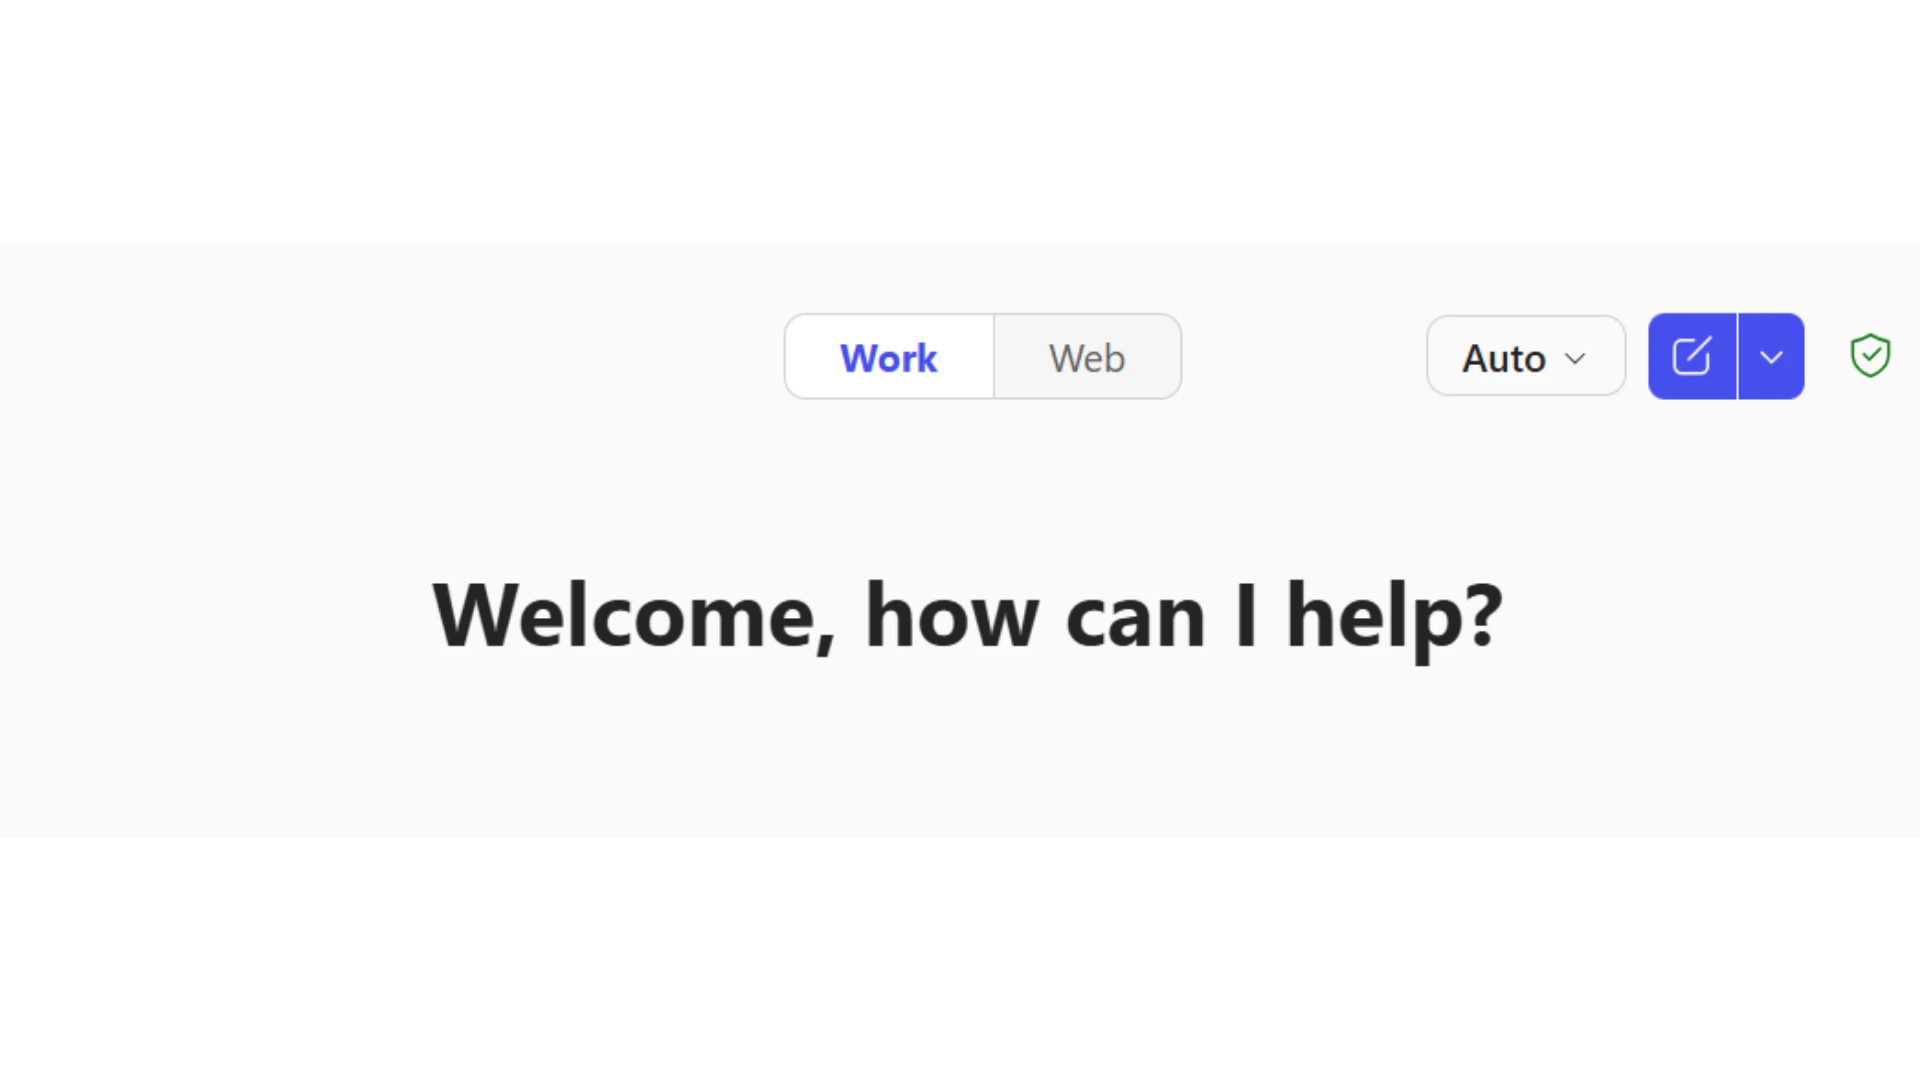 Use this when your image or prompt involves internal content: company logos, branded templates, meeting notes, or any document from SharePoint or OneDrive. Your data stays within your organisation's Microsoft 365 environment.
Use this for general image creation or when you want Copilot to reference public information. Web mode draws on internet sources and is better for generic visuals, stock-style images, and external research.
If you upload a screenshot of internal data in Web mode, that content may be processed outside your organisation's data boundary. Always switch to Work mode before sharing anything work-related.
***
## Try it with your own work
The best way to build confidence with visual features is to try them with something real. Pick one of the following and spend five minutes on it.
After your next meeting, take a photo of the whiteboard or sticky notes. Upload it to Copilot and ask: "List the key decisions and action items from this whiteboard photo." Compare the result to your own notes.
Open your next PowerPoint draft. Use Copilot to generate one image that supports your key message. Try describing the concept, audience, and style in your prompt.
Screenshot a chart or dashboard you check often, such as a weekly sales report or a project tracker. Upload it to Copilot and ask: "What are the three most important trends in this chart?" See if it picks up what you already know, and whether it spots anything you missed.
Ask Copilot to create an image for an internal announcement or a LinkedIn post. Give it the topic, tone, and any brand colours. Download the result and see how close it gets to what you would normally commission from a designer.
You do not need to get a perfect result on the first try. Treat Copilot like a colleague who drafts fast but needs your feedback. Refine with follow-up prompts like "make it more minimal" or "swap the background to white."
export const quizFinal = {
question: "Which of these is the best way to start using Copilot's visual features regularly at work?",
options: ["Wait until you have a large creative project to try it", "Pick one small, real task this week and try generating or analysing an image with Copilot", "Ask your IT team to set it up for you first", "Only use it for personal projects until you are confident"],
correctIndex: 1,
explanation: "The best way to build confidence is to start small with real work. Upload a whiteboard photo, create one slide image, or analyse a chart you already use. You will learn more from five minutes of hands-on use than from reading about it."
};
***
## Quick checkpoint (you're done when...)
You generated at least one image using a text description in Copilot
You shared an image with Copilot and asked it to analyse or summarise
You added an AI-created image to a PowerPoint presentation
You understand when to use Work mode vs Web mode for visual tasks
Complete the mini challenge to practise using Copilot's visual features with your own work
Use this when your image or prompt involves internal content: company logos, branded templates, meeting notes, or any document from SharePoint or OneDrive. Your data stays within your organisation's Microsoft 365 environment.
Use this for general image creation or when you want Copilot to reference public information. Web mode draws on internet sources and is better for generic visuals, stock-style images, and external research.
If you upload a screenshot of internal data in Web mode, that content may be processed outside your organisation's data boundary. Always switch to Work mode before sharing anything work-related.
***
## Try it with your own work
The best way to build confidence with visual features is to try them with something real. Pick one of the following and spend five minutes on it.
After your next meeting, take a photo of the whiteboard or sticky notes. Upload it to Copilot and ask: "List the key decisions and action items from this whiteboard photo." Compare the result to your own notes.
Open your next PowerPoint draft. Use Copilot to generate one image that supports your key message. Try describing the concept, audience, and style in your prompt.
Screenshot a chart or dashboard you check often, such as a weekly sales report or a project tracker. Upload it to Copilot and ask: "What are the three most important trends in this chart?" See if it picks up what you already know, and whether it spots anything you missed.
Ask Copilot to create an image for an internal announcement or a LinkedIn post. Give it the topic, tone, and any brand colours. Download the result and see how close it gets to what you would normally commission from a designer.
You do not need to get a perfect result on the first try. Treat Copilot like a colleague who drafts fast but needs your feedback. Refine with follow-up prompts like "make it more minimal" or "swap the background to white."
export const quizFinal = {
question: "Which of these is the best way to start using Copilot's visual features regularly at work?",
options: ["Wait until you have a large creative project to try it", "Pick one small, real task this week and try generating or analysing an image with Copilot", "Ask your IT team to set it up for you first", "Only use it for personal projects until you are confident"],
correctIndex: 1,
explanation: "The best way to build confidence is to start small with real work. Upload a whiteboard photo, create one slide image, or analyse a chart you already use. You will learn more from five minutes of hands-on use than from reading about it."
};
***
## Quick checkpoint (you're done when...)
You generated at least one image using a text description in Copilot
You shared an image with Copilot and asked it to analyse or summarise
You added an AI-created image to a PowerPoint presentation
You understand when to use Work mode vs Web mode for visual tasks
Complete the mini challenge to practise using Copilot's visual features with your own work